Full Tutorial v3.0 · For S2P Workbench 1.8.x
Tutorial
A step-by-step guide to S2P Workbench, from launching it and connecting an AI to running all six steps and reviewing the results.
1What this tool does (30-second read)
You provide a script and production settings as two text files (Chinese, English, or Japanese — your choice). The system feeds them through 6 AI roles (Producer → Director → Art Director → Storyboard Artist → Video Prompt Designer → QA & Revision), producing video prompts you can paste directly into an AI video engine (Sora, Veo, Kling, Wan, etc.), plus optional reference-image generation instructions for characters, scenes, and props.
script.md + production_settings.md
  ↓
1 Producer → 2 Director → 3 Art Director → 4 Storyboard
  ↓ approval gate
5 Video Prompts
  ↓
shot_prompts.md / asset_prompts.md
(⭐ main deliverable: video prompts)
  ↓
Reference / first-frame batch commands
(Artifacts tab, on by default since 1.8.0)
  ↓
6 QA Review (multi-round automatic review, optional)| Stage | Role | Output | API key needed? |
|---|---|---|---|
| Steps 1-5 | Producer / Director / Art Director / Storyboard Artist / Video Prompt Designer | One human-readable summary per step + the main deliverables shot_prompts.md + asset_prompts.md | Yes (either Anthropic or OpenAI, or Subscription mode instead — no key needed, see Chapter 4) |
| Step 5 extra | — (auto-derived, no model call) | Reference-image batch commands, first-frame batch commands (paste into any image-capable AI) | No (zero tokens) |
| Step 6 (optional) | QA & Revision (continuity review, multi-round automatic review + fixes) | QA report + fix log + re-scoring | Yes |
2Before you start
2.1 Three ways to launch, pick one
- Packaged build (Windows): double-click
Start-S2P.bat. Python is bundled — nothing to install. - Packaged build (macOS): double-click
Start-S2P.command; if it is blocked, seeINSTALL_MAC.md§3 (System Settings → Privacy & Security → Open Anyway; on macOS 14 or earlier, right-click → Open). You need to install Python 3.14 yourself (it must be 3.14 exactly; other versions won't run it) — seeINSTALL_MAC.mdin the package. - Developer / source:
python server.py(see Chapter 3).
2.2 An API key or Subscription mode — either works
API key (Anthropic or OpenAI, either one)
- Anthropic: get one at
console.anthropic.com, formatsk-ant-.... Claude Sonnet 5.5 recommended. - OpenAI: get one at
platform.openai.com, formatsk-.... The presets use GPT-6 Luna (Steps 1-5) + GPT-6.1 Sol (Step 6).
Subscription mode (ChatGPT / Codex CLI)
No API key at all — just install the Codex CLI locally and log in with your ChatGPT subscription. See §4.5.
2.3 A browser
Chrome, Edge, or Firefox — any one is fine.
3Launching & the interface
3.1 Launching (developer / source path)
Open a terminal, cd into the project folder, and run:
python server.pyA message like this means it worked:
2026-09-01 12:00:00 INFO s2p Listening on 127.0.0.1:3000Open http://localhost:3000 in your browser. The packaged builds (§2.1) instead open the browser automatically at their own local address (usually http://127.0.0.1:38517/), not localhost:3000.
3.2 Interface overview
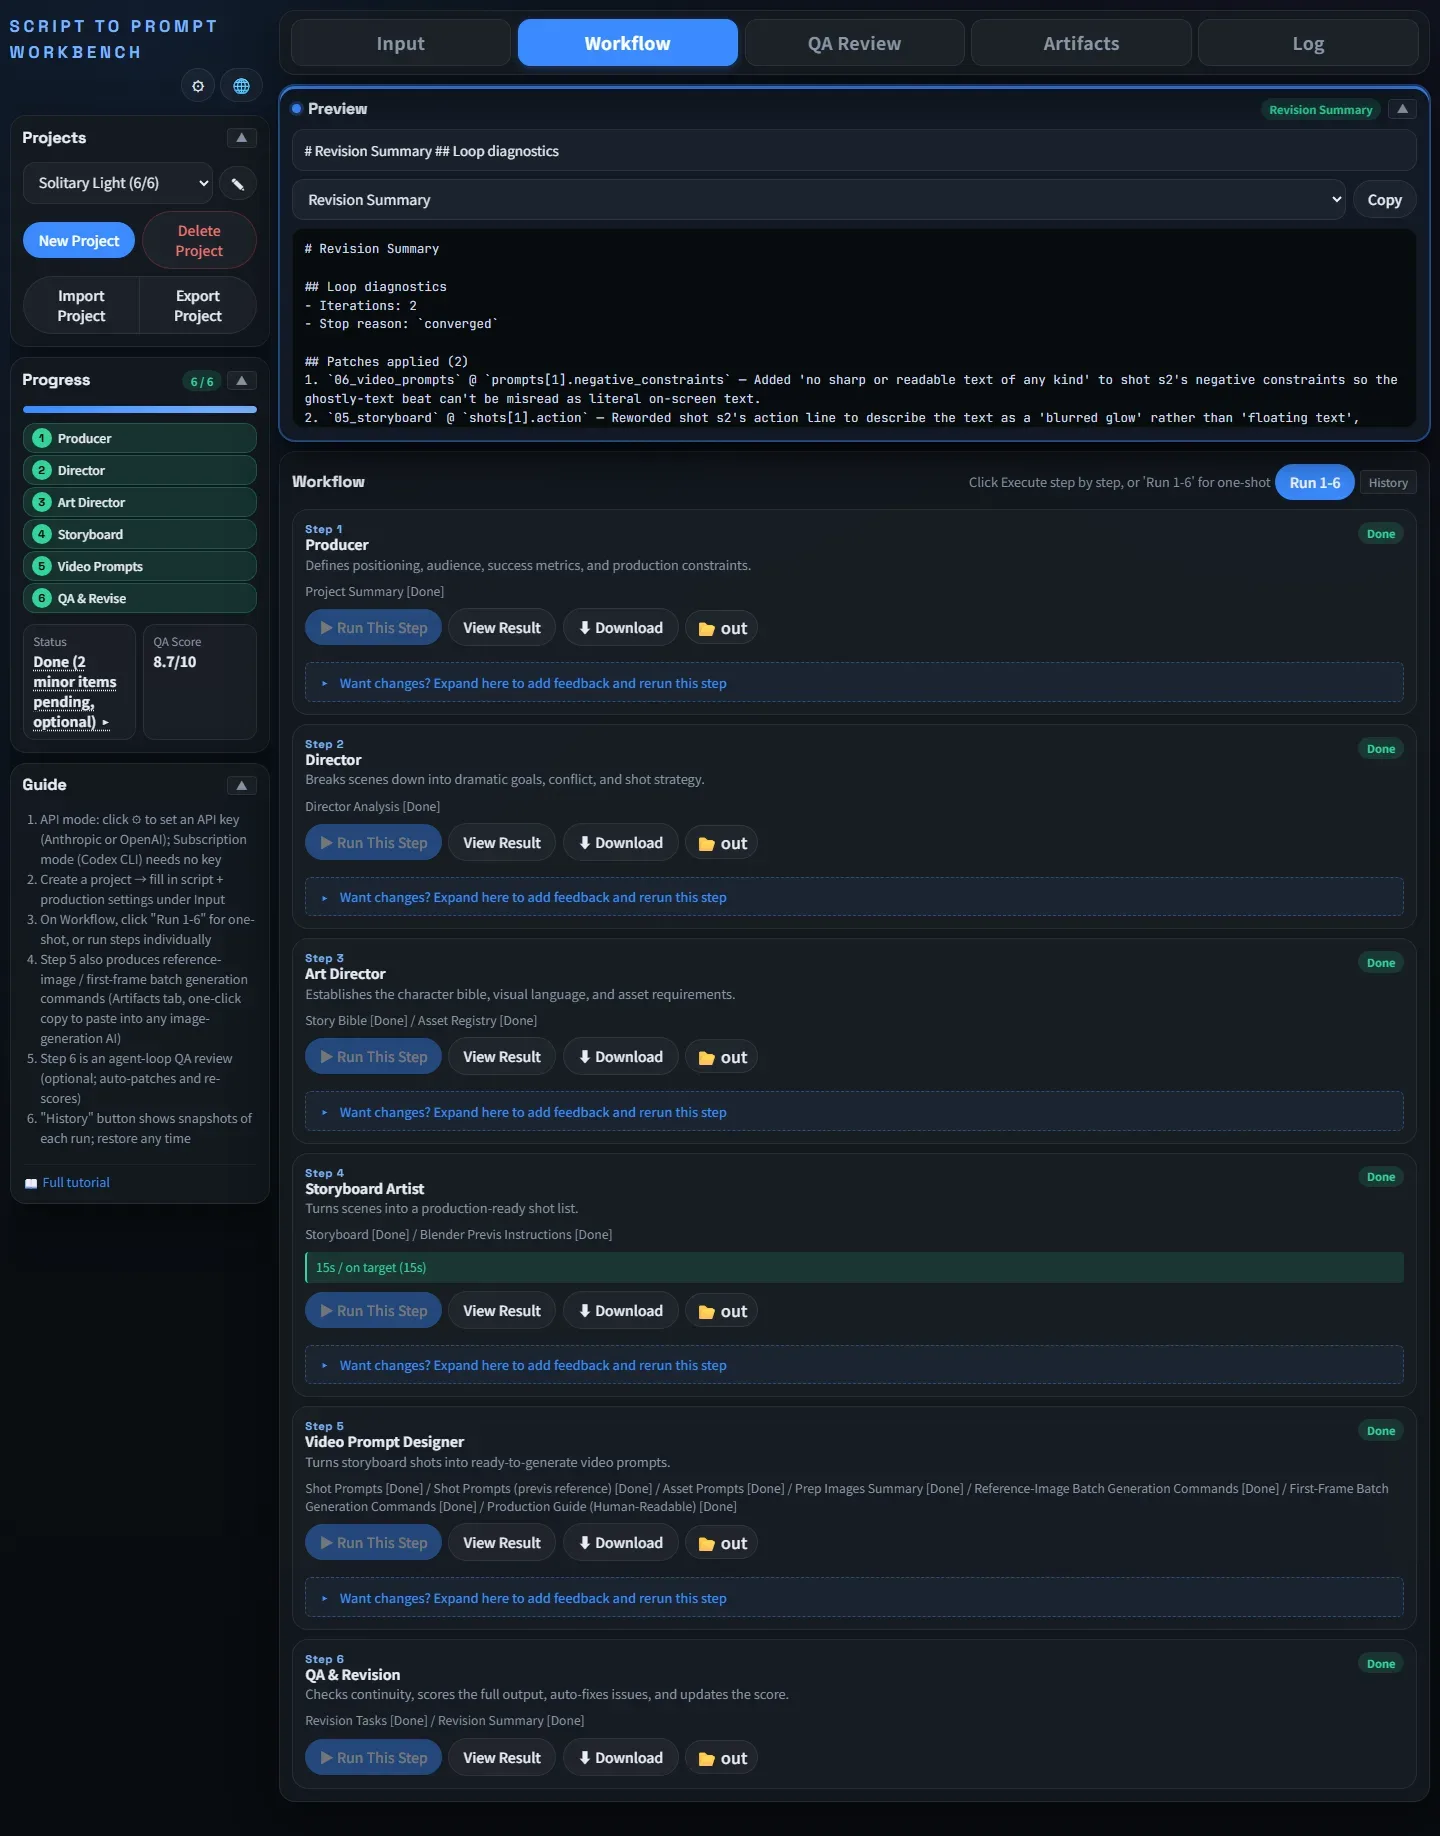
The left sidebar holds project management, overall progress, and a quick guide. The right main area has 5 tabs, left to right:
- Input: fill in the script and production settings
- Workflow: run the 6 steps, watch progress, override models, browse history
- QA Review: scores and findings once Step 6 has run
- Artifacts: the "Output Files" list comes first (preview, download, collapsible), followed by the Blender previs / reference-image / first-frame command panels in production order
- Log: this session's activity record (always English, 24-hour timestamps — see §8.5)
4Setting up an API key or Subscription mode
Click the ⚙ gear icon top-left to open the settings modal, organized into four collapsible groups:
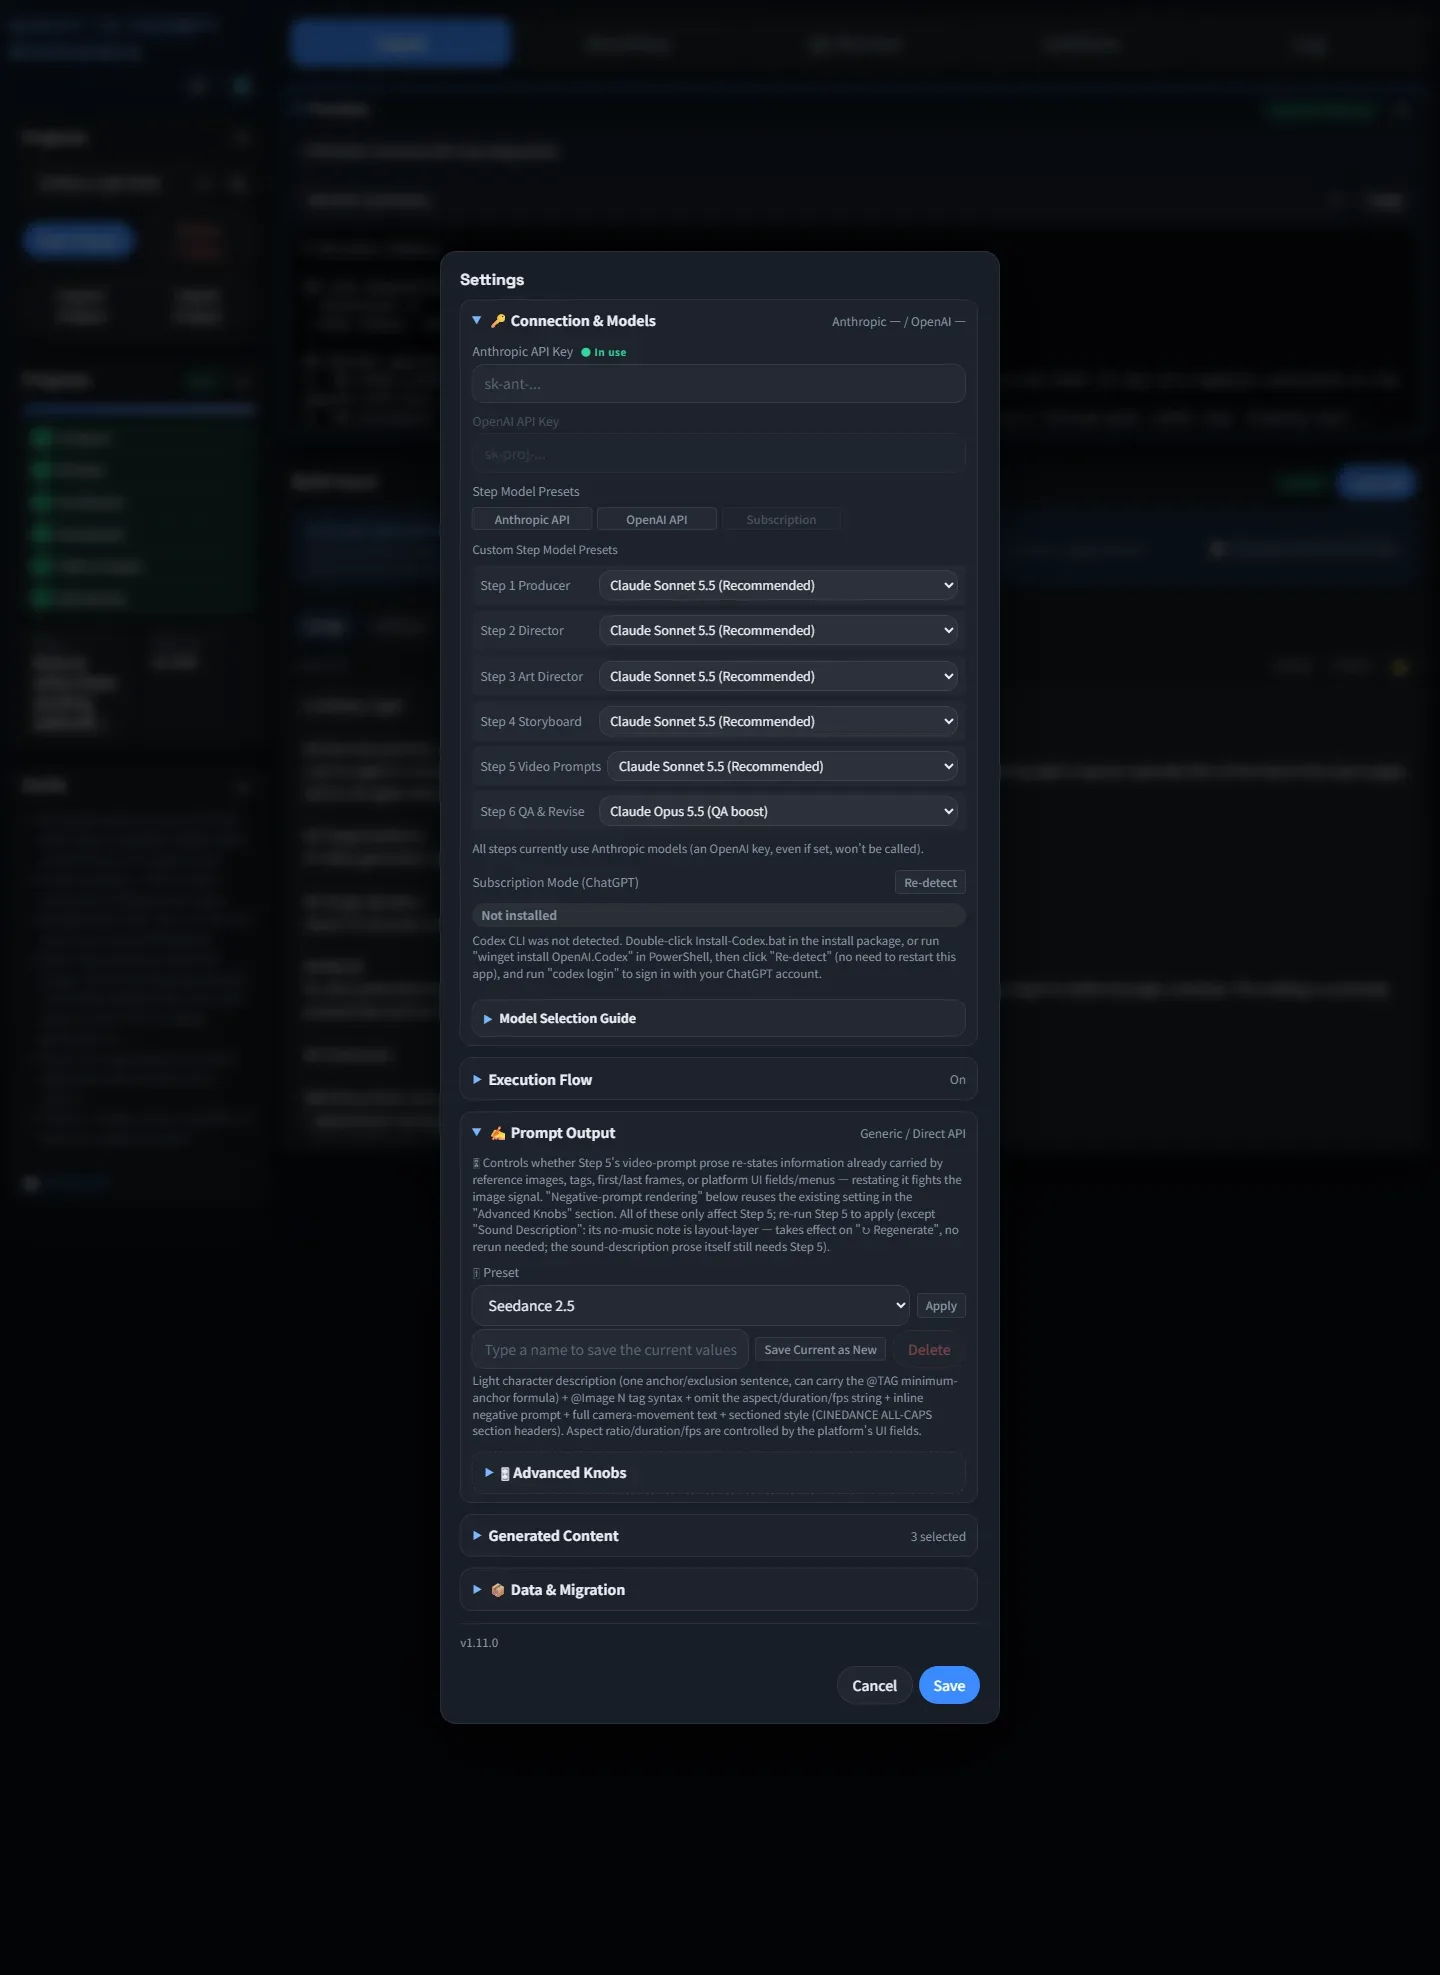
| Group | Contents |
|---|---|
| 🔑 Connection & Models | Anthropic/OpenAI API keys, six-step model presets, the Subscription mode (ChatGPT) status card, model guidance (cost estimates + this project's actual usage) |
| Execution Flow | The "Cost gate: pause after storyboard for review" toggle (on by default — see the storyboard approval gate in §7.1) |
| ✍️ Prompt Output | Output-channel presets + 🎛 advanced knobs (nine prompt-level toggles, see §6.4) |
| Generated Content | 🌐 Output language, plus whether to also emit JSON prompts / a manual-mode guide / reference-image batch commands / first-frame batch commands (see Chapter 9) |
4.1 API mode
- Enter at least one provider's key (both is fine too — the step's chosen model decides which is used)
- Each step can have its own model, or use a one-click preset (Anthropic API / OpenAI API / OpenAI Subscription). Defaults are already tuned: on Anthropic, Steps 1-5 use Sonnet 5.5 (best value) and Step 6 uses Opus 5.5 (QA needs deeper reasoning); on OpenAI/Subscription, Steps 1-5 use GPT-6 Luna and Step 6 uses GPT-6.1 Sol (measured to be enough — see §4.2 below)
- Click Save
4.2 Model list & cost estimates
| Model | Est. cost for one full 6-step run (USD) | Use case |
|---|---|---|
| Claude Sonnet 5.5 | ~$0.44 | Steps 1-5 default, recommended |
| Claude Opus 5.5 | ~$0.88 | Step 6 default (QA-tuned) |
| Claude Haiku 4.5 | ~$0.22 | Test only (quality may drop in production output) |
| GPT-6 Luna | ~$0.02 | OpenAI recommended default (Steps 1-5) |
| GPT-6.1 Sol | ~$0.44 | QA boost (Step 6 default for OpenAI API / Subscription; optional for Steps 1-5) |
| GPT-6 Astra | ~$2.20 | Flagship (opt-in) |
Basis: a full 6-step run averages ~70K input / 30K output tokens, converted from public pricing (USD; Anthropic rates verified 2026-09-30, OpenAI rates verified 2026-09-26, GPT-6.1 Sol 2026-10-06); check your provider's live billing for exact figures. The settings panel footer also shows this project's actual token usage (input/output/cache-hit rate/call count), which is more accurate than the estimate table.
Custom model IDs can still be typed into the dropdown.
GPT-6.1 Sol replaces GPT-6 Sol (same price: $2 input / $10 output per million tokens; cached input drops from $0.20 to $0.10, verified 2026-10-06). When Step 6 (QA revision) runs on GPT-6.1 Sol or GPT-6 Astra through the OpenAI API, this app automatically uses OpenAI's Responses API (tool calls on these two models need it), so both the "OpenAI API" and "OpenAI Subscription" presets use GPT-6.1 Sol for Step 6; a saved OpenAI API GPT-6 Sol is switched to GPT-6.1 Sol automatically.
One automatic re-ask (API mode): in Steps 1-5, if the model answers in plain text instead of calling the submit tool, the system automatically asks once more, telling it to resubmit in the required format, so the step doesn't fail and force a manual re-run. That re-ask counts as one extra call (usage and cost are billed once more, and the step can take up to about twice as long). No re-ask happens when the model refuses, the output is truncated, or the context limit is exceeded; if the re-ask itself fails, the original failure is reported as before.
Why this configuration: our own measurements found GPT-6 Luna already sufficient for Steps 1-5 (schema, dialogue/on-screen-text coverage, and duration control all matched or beat the pricier Sol), so Step 6 defaults to Sol, with Astra as an opt-in upgrade. The sample size is small (n=1) — if a specific step's quality isn't good enough, you can upgrade just that step.
4.3 If Step 6 hits a rate limit
Switch Step 6 to a smaller model with typically looser limits (e.g. Opus 5.5 → Sonnet 5.5), or wait and retry; Step 5's batched execution also has its own automatic backoff-and-retry, see §7.2.
4.4 Execution Flow group: the cost gate
The "Cost gate: pause after storyboard for review" toggle is on by default. When on, "Run 1-6" pauses after Step 4 (storyboard) completes and shows the "Storyboard Approval" gate so you can preview before committing further; when off, "Run 1-6" runs straight through all 6 steps without stopping at the storyboard. See §7.1.
4.5 Subscription mode (ChatGPT / Codex CLI)
If you have a ChatGPT subscription and don't want to set up a separate API key, use Subscription mode instead: the server calls a locally installed, logged-in Codex CLI, billing against your ChatGPT subscription quota instead of per-call API pricing.
Step 1: install the Codex CLI — on Windows pick one of A, B or C; on macOS use D:
- A. Double-click
Install-Codex.bat(recommended on Windows; Windows only): it ships at the root of the install package, tries the official winget package first and falls back to the official standalone executable if that fails — no Node.js needed either way - B. Paste into PowerShell:
winget install --id OpenAI.Codex -e - C. Advanced (if you already have Node.js):
npm install -g @openai/codex - D. macOS: run
brew install --cask codexin Terminal (recommended); if you already have Node.js,npm install -g @openai/codexalso works.Install-Codex.batis Windows-only and does not apply to a Mac
On Windows, Codex is installed into your user folder (
%LOCALAPPDATA%\S2P_Workbench\codex), so upgrading to a newer S2P later won't require reinstalling it. The installer supports both x64 and ARM64 Windows, automatically adds the Microsoft Visual C++ runtime (if missing) and ripgrep (Codex's runtime dependencies), and works even if you double-click it while it is still inside the zip file, so there is nothing else to install. If Windows shows the blue "Windows protected your PC" screen the first time you run it, click "More info" then "Run anyway".Back in S2P, click "Re-detect" in ⚙ Settings → "🔑 Connection & Models" — no need to restart this app. If it is still not detected on macOS, quit and restart S2P, then click "Re-detect" again.
- A. Double-click
- First click the "Log in to Codex" button in ⚙ Settings → "🔑 Connection & Models" and complete the ChatGPT authorization in the browser window that opens (the panel shows a copyable login URL). Running
codex loginin a terminal is only an alternative, for installs done via winget, npm or brew; a copy downloaded directly byInstall-Codex.batis not on your PATH, so the terminal will not findcodex— use the button instead - Back in ⚙ Settings → "🔑 Connection & Models", the "Subscription Mode (ChatGPT)" status card shows "Ready"
- The six per-step model dropdowns now show an extra "Subscription Mode (ChatGPT)" option group; the "OpenAI Subscription" one-click preset switches all six steps at once (Luna for Steps 1-5, GPT-6.1 Sol for Step 6)
The GPT-6 family (Sol / Astra / Luna) needs a recent enough Codex CLI to recognize it. If the installed Codex CLI is too old and doesn't support GPT-6, the "Subscription Mode (ChatGPT)" group in the six per-step model dropdowns only lists GPT-6.1 Sol (marked as needing a Codex CLI update), and any other GPT-6 model already saved will show as "— Custom ID…" instead (the settings panel's subscription status card shows a matching hint too). Double-click Install-Codex.bat again, or run winget upgrade OpenAI.Codex (if you already have Node.js, npm i -g @openai/codex@latest in a terminal also works) to update, then click "Re-detect" and try again.
GPT-6.1 Sol (Step 6 of the "OpenAI Subscription" preset) needs Codex CLI 0.159.1 or later. On an older CLI the subscription status card says so, the GPT-6.1 Sol options in the dropdown are marked "needs Codex CLI 0.159.1+", and running the step tells you to update (it never silently switches to another model). Until the Codex CLI is confirmed to support it, a saved Subscription-mode GPT-6 Sol stays as it is and the "Subscription" preset uses GPT-6 Sol for Step 6; after updating and clicking "Re-detect", they switch to GPT-6.1 Sol. Update the same way as above: double-click Install-Codex.bat again, run winget upgrade OpenAI.Codex, or npm i -g @openai/codex@latest.
| Status | Meaning |
|---|---|
| Not installed | Codex CLI wasn't detected; install and log in first |
| Installed, not logged in | Detected but not logged in yet; click the panel's "Log in to Codex" button (or run codex login in a terminal) |
| Ready | You can pick a Subscription-mode model directly from the dropdown and run |
If a step's model is set to Subscription mode but you aren't logged in, running that step is blocked with a prompt to finish codex login or switch back to API mode.
On a shared computer (e.g. a classroom), sign out afterward by running codex logout in a terminal, to avoid quota misuse.
5Creating your first project
- In the sidebar's "Projects" section, click New
- Type a project name (e.g.
Solitary Light) and click Create - The project loads automatically. The dropdown shows your project name; you can rename it any time via "Rename"
Once created, this structure appears on disk:
projects/
└── solitary_light/
    ├── input/              ← the two .md files from Chapter 6 live here
    │   ├── script.md
    │   └── production_settings.md
    ├── workspace/          ← structured JSON output per step
    ├── output/             ← human-readable output files
    ├── assets/             ← where generated images land (characters, etc.)
    └── history/            ← automatic snapshots (Chapter 11)
5.1 Export & import (.s2p files)
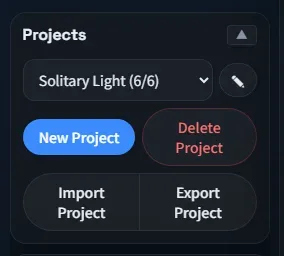
The "Projects" sidebar's Export packages the whole project into a single .s2p file (save it anywhere — cloud drive, USB stick, etc.); Import restores the whole project from that .s2p file. A .json file exported by an older version can also be imported directly.
5.2 Migrating from an older version
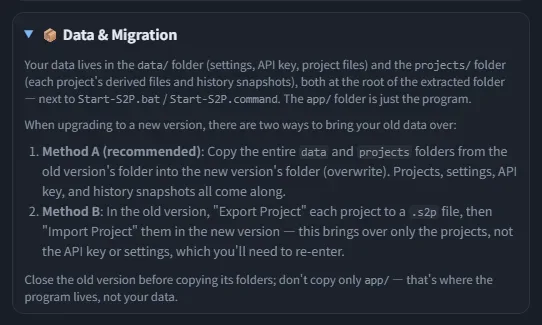
Every time you unzip a new version into a fresh folder, it looks like "my projects are gone" — they're not, the new folder just doesn't have your old data yet. There are two ways to migrate:
- Method A (recommended): Copy the entire
dataandprojectsfolders from the old version's folder into the new version's folder (overwrite). Projects, settings, API key, and history snapshots all come along. - Method B: In the old version, "Export Project" each project to a
.s2pfile, then "Import Project" them in the new version — this brings over only the projects, not the API key or settings, which you'll need to re-enter.
6Writing the input documents
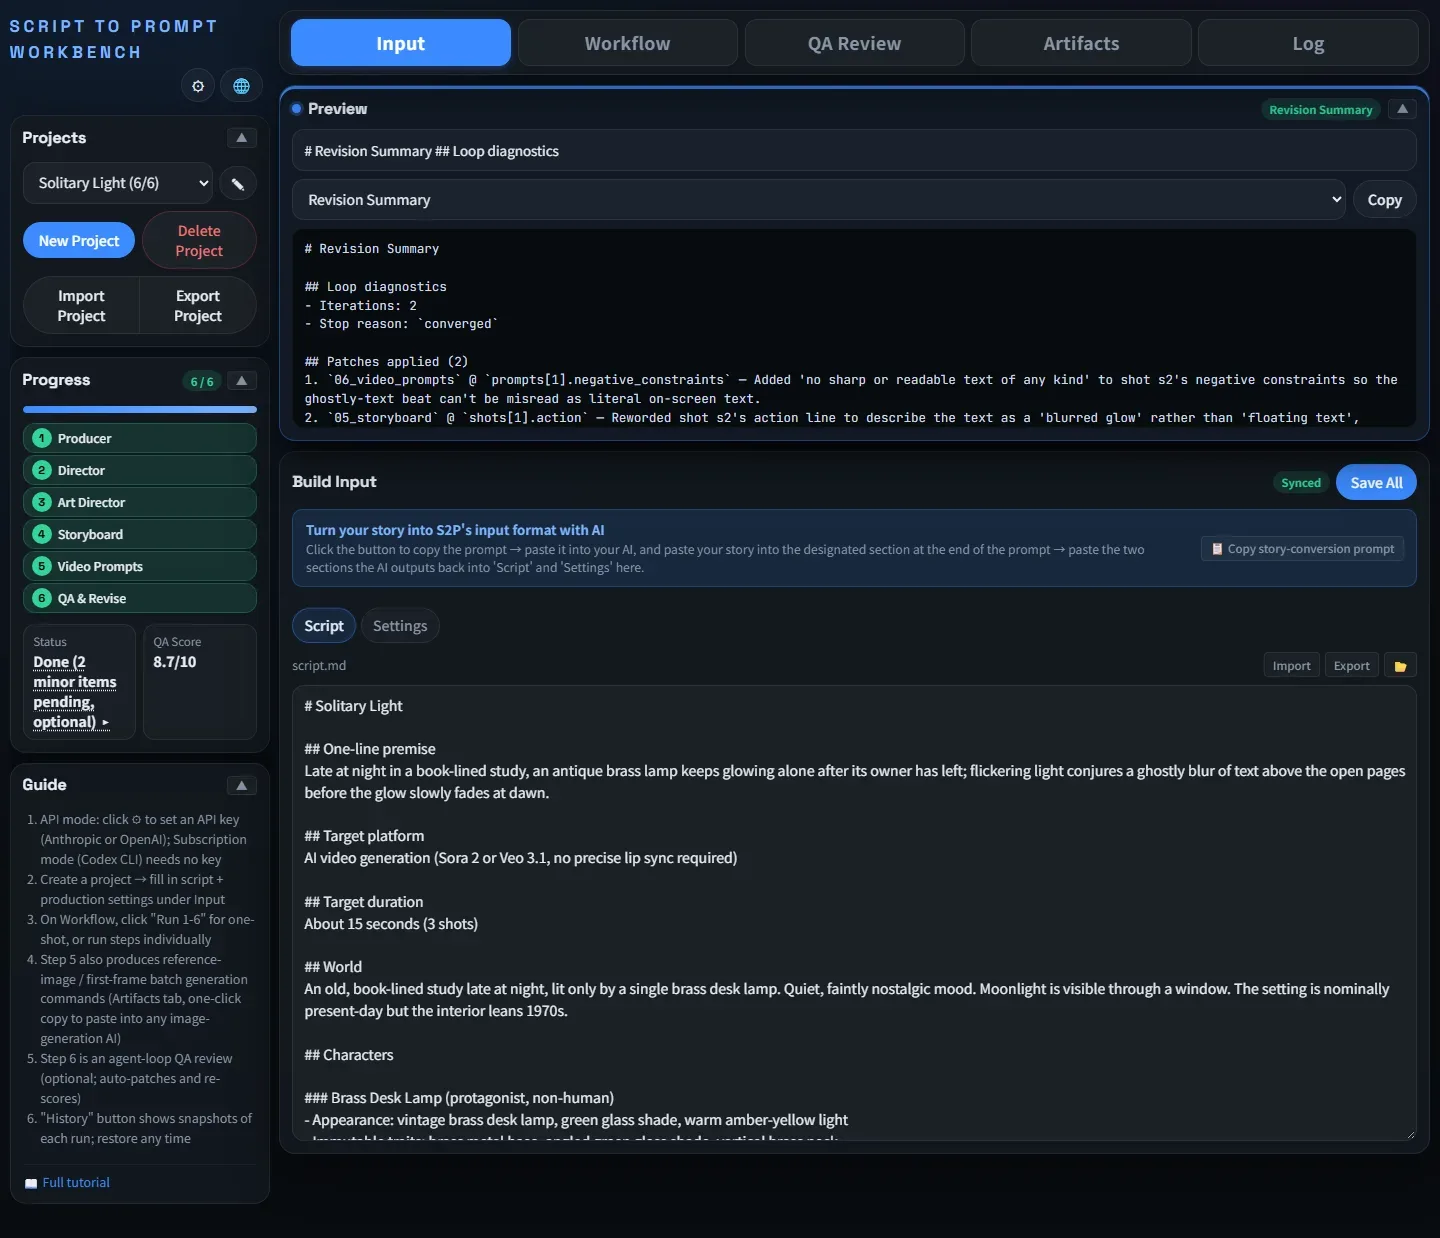
Switch to the "Input" tab — it has two sub-tabs: Script and Production Settings.
6.1 script.md (the script)
This is the foundation of the entire pipeline — every later step reads it. You can write it in Chinese, English, or Japanese. Include at least:
- A one-line logline
- Target platform (Sora / Veo / Kling…) and target length
- World / setting
- Characters (list each one's "invariant traits" — e.g. "short black hair, gray trench coat" — key to cross-shot consistency)
- Scenes (location, time, what happens)
Not sure how to structure it? Appendix A has a full copy-paste example. You can also use the "copy story conversion prompt" button in the next section to have your own AI draft it for you.
6.2 production_settings.md (production settings)
This describes "what look you want" + "production constraints" + "commercial/delivery parameters". Include at least:
- Visual style (cinematic / documentary / animated…)
- Lighting (natural / neon / golden hour…)
- Camera pacing (slow push / fast cuts / long takes…)
- Color tendencies
- Forbidden styles (explicitly list what you don't want — just as important as what you do)
- Production constraints (avoid crowds / avoid precise lip-sync / avoid fast motion…)
- Delivery format (e.g.
9:16,24fps) — the system reads the aspect ratio you write here as the project'saspect_ratio, and the batch commands in Chapter 9 suggest the matching ratio accordingly
6.3 📋 Copy story conversion prompt
Above the "Input" tab there's a 📋 Copy story conversion prompt button: clicking it copies a pre-written prompt to your clipboard. Paste it into your own AI (ChatGPT, Claude, etc.) with your story outline appended at the end, and the AI will output two blocks you can paste straight back into the "Script" and "Production Settings" sub-tabs here. The prompt itself is built in (an English master template) and isn't shown on screen.
6.4 Advanced: nine prompt-output knobs
⚙ Settings → ✍️ Prompt Output → 🎛 Advanced Knobs holds nine fine-grained toggles that affect how Step 5's prompt body is written: character appearance description, reference-tag syntax, composition/framing description, camera-motion description, aspect-ratio/duration/fps string, scene & prop description, overall style (long vs. short), negative-prompt presentation, and sound description.
All defaults are already tuned — leave them alone unless you have a specific need; each knob has a one-line hint explaining when to switch it (e.g. omit a description once the target platform already controls that information via reference images or a menu, to avoid text and image signals fighting each other). The "Output Channels" factory presets (Seedance 2.5 / MiniMax H3 / Higgsfield / Generic·API-direct) apply the whole set at once.
The "🔊 Sound Description" knob has three options, all of which are:
- written into the body + a trailing no-BGM statement (default)
- written into the body without the statement
- omitted entirely
Dialogue content is unaffected regardless of which option you pick.
6.5 🌐 Output language
⚙ Settings → Generated Content → Output Language, two options:
- Match the script's language (default): narrative text (titles, summaries, storyboard descriptions, QA reports, etc.) follows the script's language, auto-detected as Chinese, English, or Japanese; the video prompt body itself is always English (so the output reliably works with mainstream international video engines).
- All English: narrative text is forced to English too.
This setting is independent of the interface language (the globe icon top-right) — the two never affect each other.
6.6 Saving
Click Save All Input at the top right once you're done. The status badge changes from "Not saved" to "Synced".
7Running the pipeline: Run 1-6 and the storyboard approval gate
Switch to the "Workflow" tab — you'll see 6 step cards.
7.1 Recommended: Run 1-6
There's a blue "Run 1-6" button at the top of the tab. Clicking it:
- Runs a pre-flight check: is the API key (or Subscription mode) ready? Does
script.mdhave content? Only proceeds if both pass - Shows a single confirmation dialog ("Run all six steps in sequence… Continue?")
- Runs Steps 1 → 2 → 3 → 4 in sequence
- While each step runs, its card lights up with a progress banner showing the model and current status
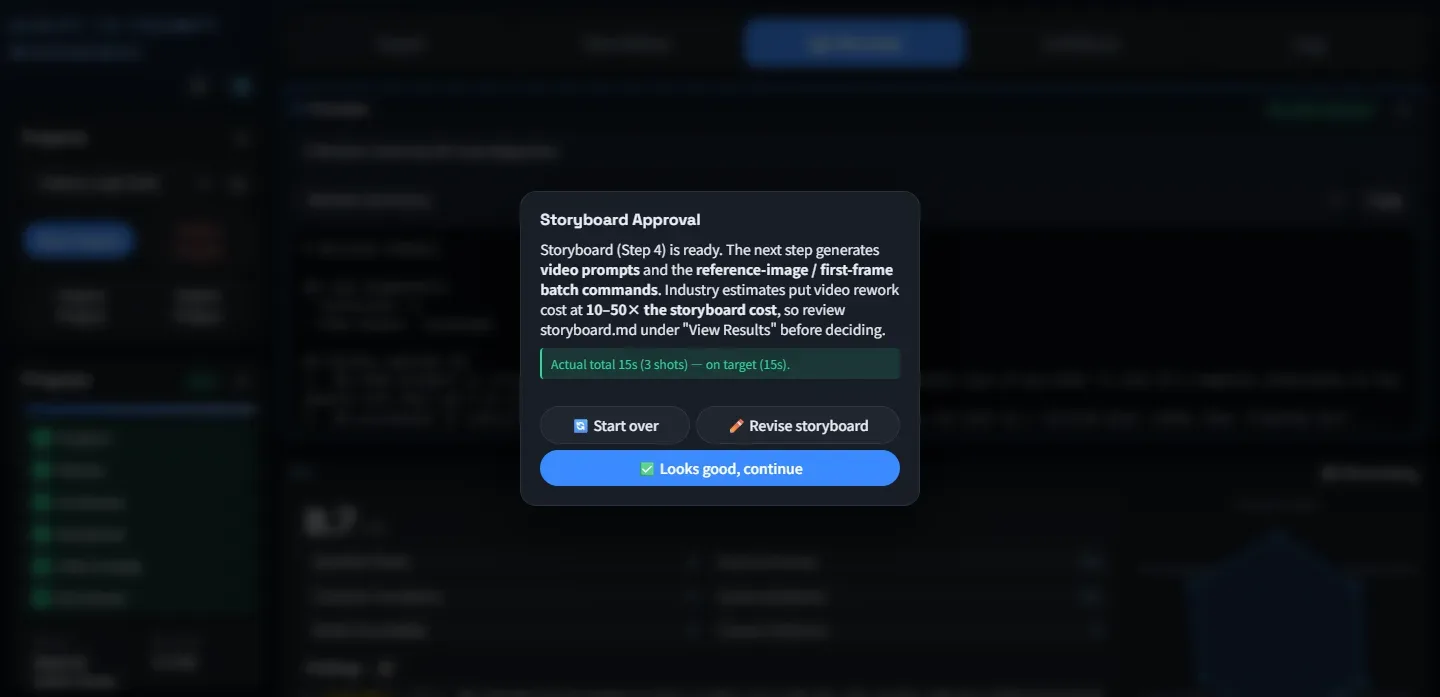
- Once Step 4 (storyboard) finishes, if the cost gate toggle (§4.4) is on (the default), it stops at the "Storyboard Approval" gate: "Storyboard (Step 4) is ready. The next step generates video prompts and the reference-image / first-frame batch commands. Industry estimates put video rework cost at 10–50× the storyboard cost, so review
storyboard.mdunder 'View Results' before deciding," with three choices: ✅ Looks good, continue / ✏️ Revise storyboard / 🔄 Start over - Choosing "continue" resumes automatically through Steps 5 → 6 until everything is done
If some dialogue shots look too short to speak their lines (estimated at about 5 CJK characters or 2.7 English words per second), the gate shows an extra warning line with an expandable list of each shot's current seconds vs the estimated seconds needed; the Step 4 card shows the same hint. The check costs no tokens and is only a heads-up: QA revision may lengthen those shots, pushing the total runtime past the target.
When the dialogue is longer than the target: once the director analysis (Step 2) finishes, if the script's lines already exceed the target duration at a natural pace, the Step 2 card says so and splits the time between the script's own lines and AI-written ones. The system never cuts or rewrites script lines; what happens depends on your settings.
- With the Flexible duration policy, the film runs long so the lines fit, and each long-film segment may grow to about 1.3 times the time its dialogue needs, a cap QA follows too.
- With the Hard cap, shots with dialogue are not compressed; if the cap can't be met, trim lines or raise the target.
If dialogue handling is set to no dialogue at all, none of these dialogue-timing checks apply; with a separate subtitle list, timing is based on reading the subtitles. The Step 4 segment table and the "Storyboard lock-in" gate show each segment's dialogue cap; a segment over its target but within that cap is not flagged as an error.
When it finishes, a toast says "Run 1-6 completed ({total} steps, including QA Review & Revision)." — note this differs from older behavior: QA (Step 6) is now included in the one-click run; you no longer need to trigger it separately.
7.2 Step 5 batching
When a project has more than 10 shots, Step 5 automatically batches its calls (10 shots per batch max), with live batch progress shown on the step card and in the log (e.g. "Batch 2/3 (shots) done").
If a batch hits an API rate limit (HTTP 429), the system automatically waits and retries once (single attempt, capped, cancellable), showing a countdown on the card — no manual intervention needed. Only a repeated failure surfaces an error.
Each batch is saved the instant it completes: a cancel, a disconnect, or a server restart mid-run never loses the batches already done — the step card shows "N/M batches completed (kept)" and the button label changes to "Resume (from batch N)"; running the step again automatically picks up where it left off, with no need to re-pay for batches already completed.
7.3 Running step by step (manual control)
Each card has a "Run this step" button so you can go one step at a time, reviewing each result before deciding the next move.
7.4 Cancelling mid-run
- Single-step cancel: a "Cancel" button appears on a running card. Step 6 (multi-round review) exits gracefully at its next round check; in API mode Steps 1-5 can only be disconnected client-side — the backend still finishes but the result isn't saved. In subscription mode (Codex), cancelling, closing the page, or a timeout also ends the background Codex process, so it stops consuming your subscription quota.
- Whole-sequence cancel: while "Run 1-6" is active, a "Cancel sequence" button appears at the top, stopping the entire run.
7.5 When a step fails
- "Run 1-6" is fail-fast: any step failing stops the whole sequence, with an error dialog telling you "stopped at step N."
- After fixing the underlying problem (e.g. API quota exhausted, a network error), click that step's "Run this step" to resume from there — no need to start over.
- Earlier successful steps and their snapshots are untouched and never overwritten.
- Subscription mode (Codex) timeouts: on Steps 1-5, if Codex is still producing output when the time limit is reached, the limit is extended once automatically (the card shows "Codex is still working — time limit extended by N s"); if Codex has gone completely silent for several minutes, the call is retried once automatically instead (the card shows "Codex didn't respond — retrying once automatically").
If it still times out, there are two different messages.
- "No response after N s" is usually a temporary stall on the Codex/OpenAI side, not a script that's too long — there's no need to shorten the script; just click that step's "Run This Step" again, and if it keeps happening, check your network or OpenAI's service status, or try another model.
- "The model was still working but hadn't finished" means the step needed more time than even the extended limit: lower that step's reasoning effort, switch it to a faster model, or split a very long script into acts (see 7.8), then click "Run This Step" again.
7.6 ⚠ Output quality warning
After a step finishes, a yellow "⚠ Output Quality Warning" on that card's result panel means the system detected a quality concern in the derived files (e.g. a file that should have content is nearly empty). It doesn't necessarily mean the step failed, but it's worth checking.
When you see this warning:
- Read the warning text first — it usually names the file and field in question
- Expand "View Results" to confirm whether content is actually missing
- If content is genuinely missing, re-running that step with "Run this step" usually fixes it
7.7 Automatic Long-Form Segmentation (Optional, Auto-Triggered)
For a project long enough that the estimated shot count exceeds 35 (roughly a 190-second-or-longer target duration, or a script with enough dialogue), Step 4 (storyboard) automatically runs as several scene-grouped segments instead of one call — there's no toggle to turn this on. Projects under the threshold are completely unaffected: the prompt and output stay byte-identical.
- How segments are decided: following Step 2 (director analysis)'s scene order, the film's total target duration is split across scenes proportionally to each scene's dialogue and narrative weight, then consecutive scenes are merged into segments of roughly 18-35 estimated shots each (the last segment can be shorter; a single scene over 35 shots is never split further).
- Running segment by segment: the Step 4 card lists every segment's scene range, status (pending / done / failed / stale), and that segment's actual total duration vs its target. Click "Run next segment" to run one segment at a time, or "Run all remaining" / the card's own "Run this step" / "Run 1-6" to run every not-yet-done segment in one request.
- Resuming after an interruption: a cancel, timeout, upstream error, or server restart never loses an already-completed segment. Reloading the project shows progress from whatever's kept, and "Run next segment" automatically starts from the first not-yet-done one. If the script, settings, or feedback changed since, the earlier progress is marked "Stale" and the next run starts the whole step over.
- Storyboard approval gate: once every segment is done, the gate that opens also lists each segment's actual total vs target (alongside the existing whole-film line) — a segment over target is highlighted, with a hint that you can name which segment(s) to shorten in Step 4's feedback box and rerun.
- Cost: Step 4 goes from one call to several (one per segment). In API mode, the static content shared across every call (story bible, asset registry, etc.) is cache-eligible — short films are completely unaffected and cost nothing extra. In subscription mode, each segment is its own independent
codex execcall, so in practice there's almost no cache saving. - Step 6 (QA & revision) also reviews segment by segment: on a long-form project Step 6 reviews each segment on its own — it only sees that segment's shots, saves after every segment, and can be interrupted and resumed; its card shows the same per-segment status and "Run next segment" button. It no longer fails just because the film is too long to read in one pass, and short films are unaffected.
The per-segment QA reports are merged into one whole-film report (scores are averaged weighted by each segment's total shot duration; findings and risks are tagged with their segment).
Once every segment has been reviewed, the system automatically runs one more "full-film continuity check": it first compiles a table of every shot's characters, props, location and duration, then asks the AI to look only for cross-segment inconsistencies (a character's look or a prop that does not match between segments, a location or time of day that does not connect, a total length off target) and fix them. It is the last row of the segment table on the step card, can also be interrupted and resumed, and simply ends if it finds no cross-segment problem.
Cost-wise, Step 6 on a long film costs roughly the sum of one QA run per segment, plus the full-film check, which costs about one more small segment QA.
7.8 Producing a Long Film in Parts (One Long Script, Several Projects)
Don't squeeze a 60-minute film into a single project. Split it into 5–6 parts of about 8–12 minutes each and make one project per part. Every project's step 3 regenerates the character and set settings, so you have to keep the parts consistent on purpose:
- Split the script at natural breaks: pick scene changes, time jumps or story beats that wrap up, and cut the script into 5–6 parts of roughly 8–12 minutes each.
- One project per part; targets add up to the total: set each project's target duration to that part's seconds, so all parts together equal the full running time.
- Use the same descriptions in every part's production settings: describe each character's look and costume, each prop and each set in the same words in every part, instead of writing them fresh each time.
- Put 2–3 lines of "previously" at the top of each part's script: a couple of sentences on where the previous part ended (where the characters are, what has happened, the emotional state) so the model can pick up from there.
- Finish and check one part before starting the next: run a part through QA and make sure the characters and sets look right before moving on, so problems don't repeat in every part.
- From part 2 on, use "Reuse another project's settings": in the left-hand Project panel click "Reuse another project's settings…", pick the previous part's project and click "Apply" (or choose it under "Reuse settings from (optional)" when you create the new project). The previous part's characters, sets and assets are copied in, together with the reference images under
assets/characters,scenesandpropswhose file names start with a reused entry's id (at most 300 files / 300 MB; existing files are never overwritten; shot first frames are not copied).Then run step 3: reused characters, sets and assets that appear in this part keep the same id and name and their locked appearance fields (for characters, the identity in
anchor_locks.identityand similar), and only newly introduced ones are added; a character's costume and state may change per part.If the model alters a reused entry that has the same id and the same name, the app restores it automatically when saving (no extra tokens); a new entry that wrongly reuses a reused id (with a different name) is left untouched and a warning is shown.
If step 3 has already run in this project, re-run step 3 for the reuse to take effect, and then re-run steps 4–6 as well. To change a reused character's identity, first click "Stop reusing" (feedback cannot change locked fields); to stop reusing, click "Stop reusing" (reference images already copied are kept).
Note: what is reused is a snapshot of the previous part's settings taken when you click "Apply"; later edits to the previous part are not synced automatically, so apply again to refresh. If the previous part itself reused settings, entries from earlier parts are carried over too; the list sent to the model is capped (about 12,000 tokens) and is truncated with a warning when it gets too large. Reusing also makes step 3 read a character / set / asset list, so its input grows slightly.
8Viewing results
Once every step has run, there are three main places to look:
8.1 Result preview (collapsible panel up top)
Pick any output file from the dropdown to preview it; "Copy Content" copies it to your clipboard.
Files over 200,000 characters show only the beginning ("Show full text" or "Download" is offered); "Copy Content" always copies the full text.
Each step card's "View Results" button also auto-expands the preview to that step's output.
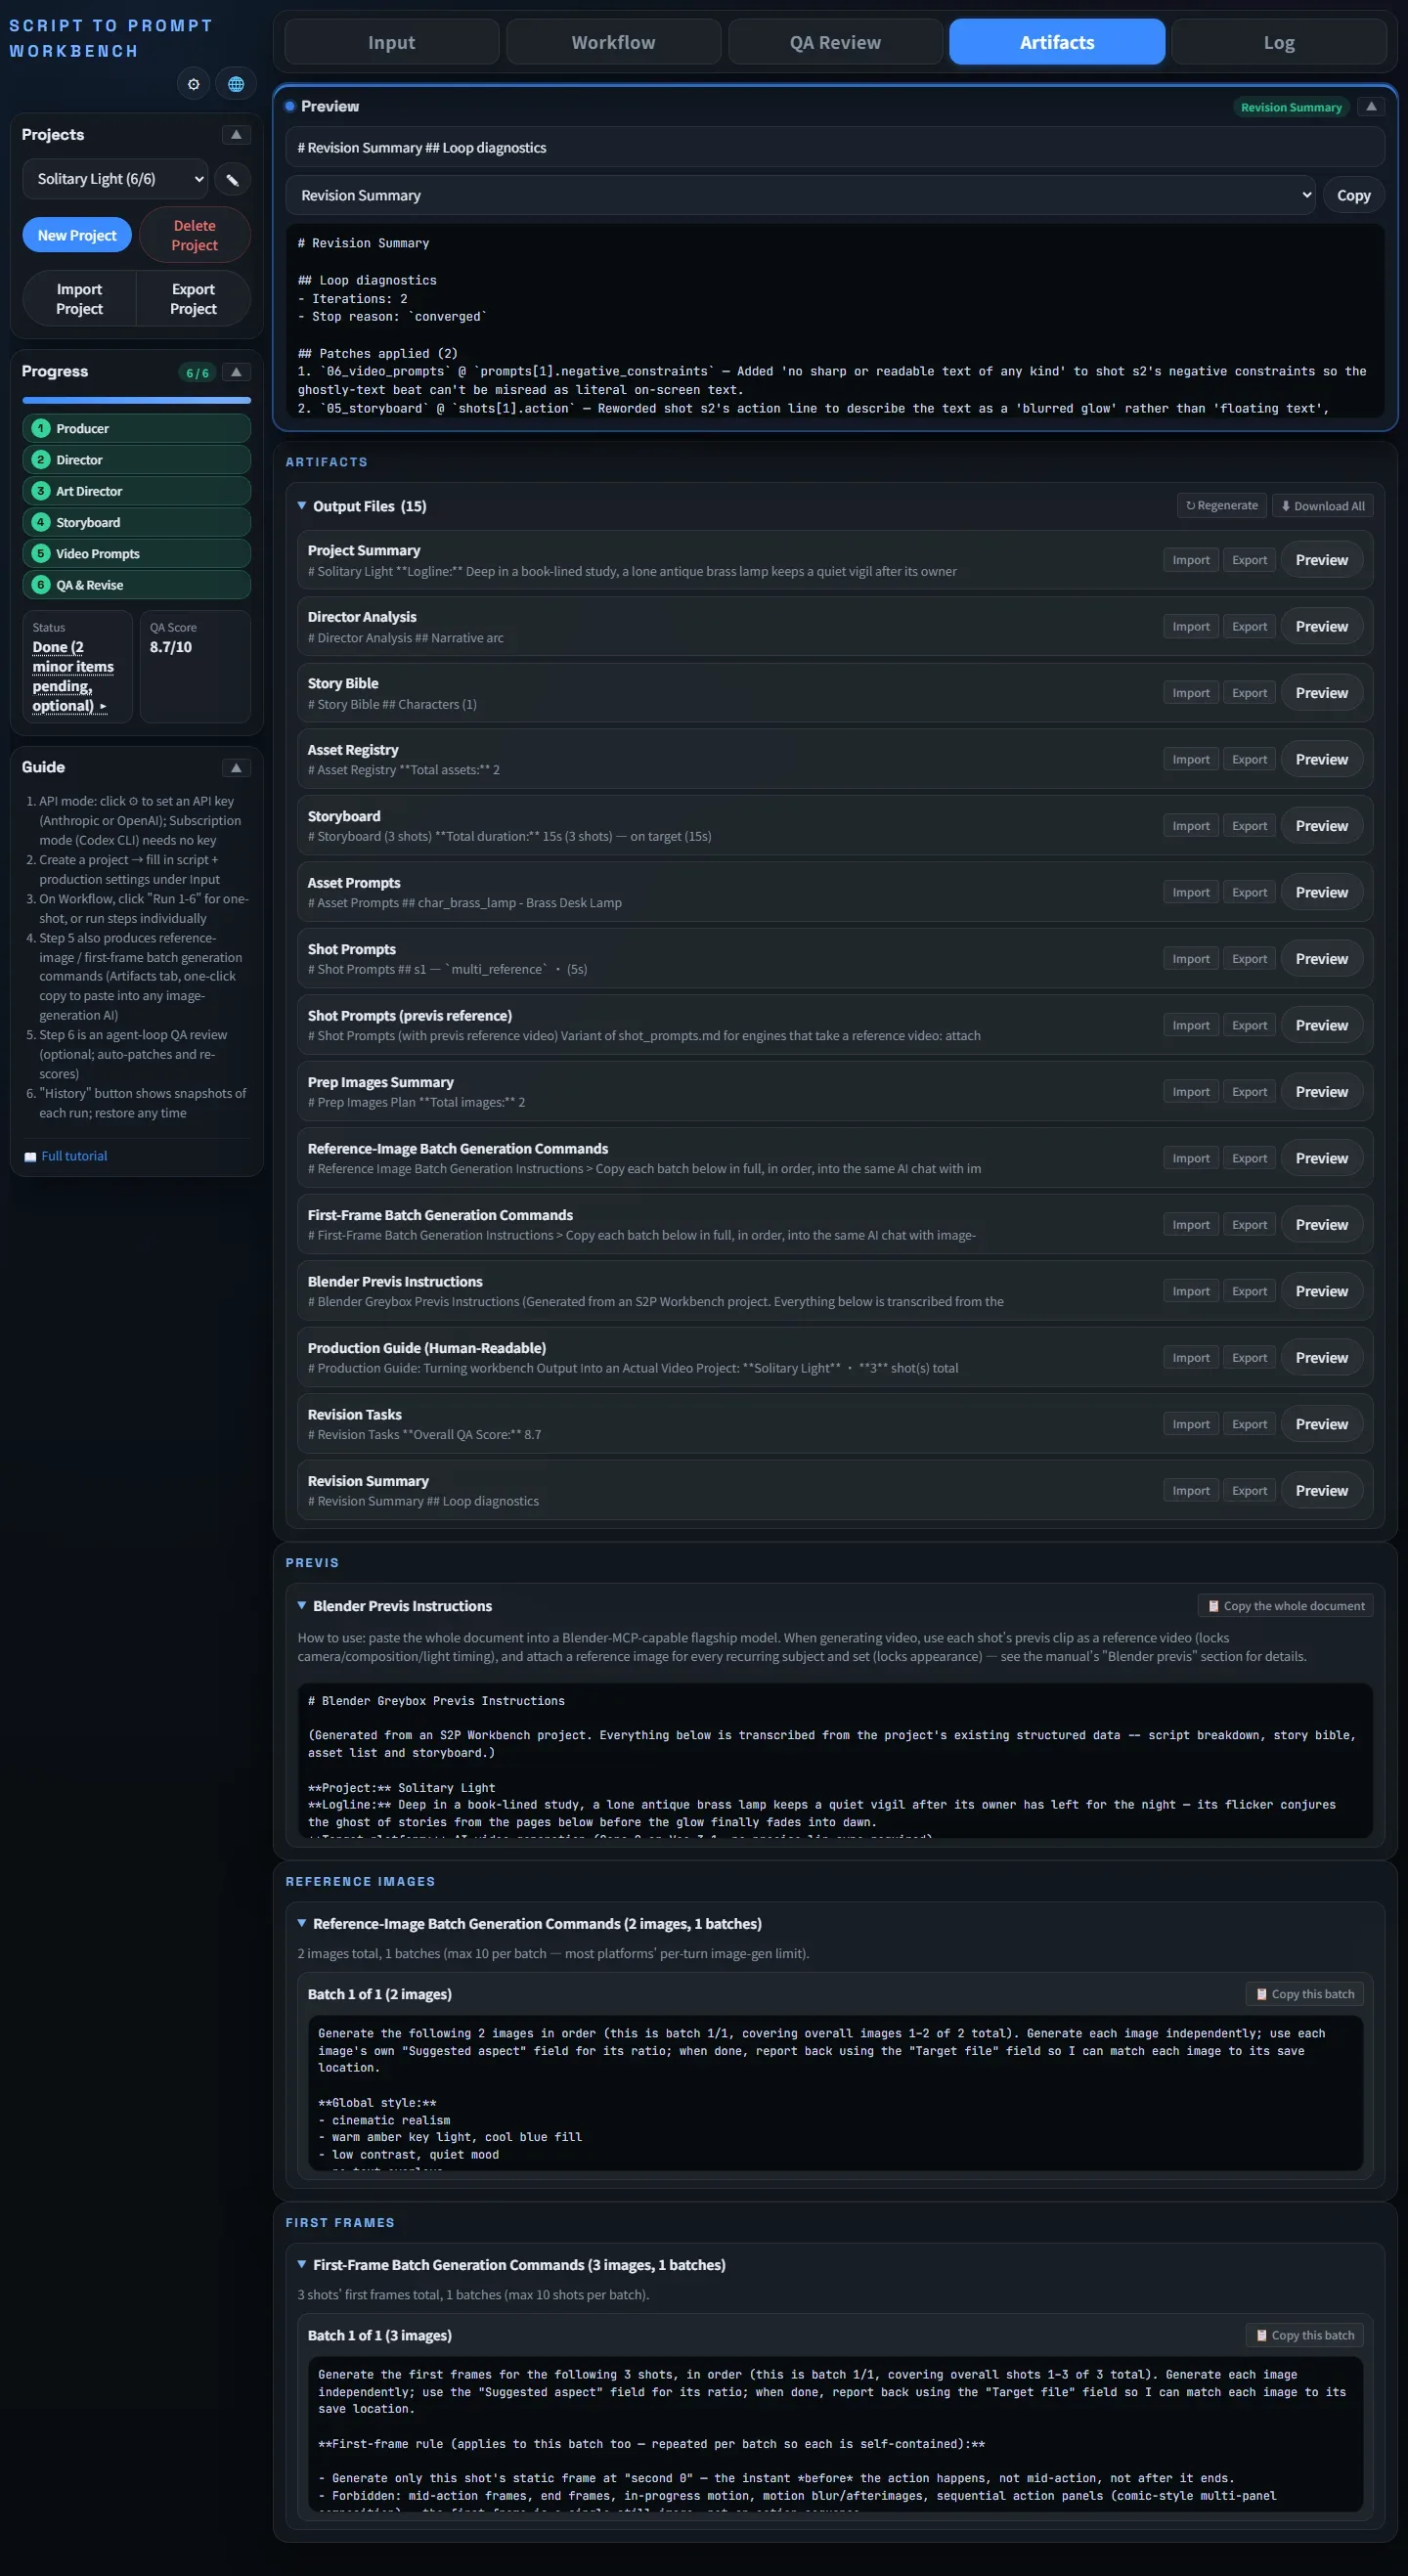
8.2 Artifacts tab
The tab opens with the "Output Files" block at the top, directly under the pinned Preview area: it lists every human-readable output, and a row's "Preview" button sends that file to the preview area above.
The block's title bar carries the ⬇ Download All and ↻ Regenerate buttons; click the title bar to collapse the whole block (your choice is remembered).
Below it, in production order, come the three command panels — Blender previs → reference images → first frames — each collapsible too.
The most important output file is shot_prompts.md — your list of video prompts. Each shot looks like this:
## s1 — `multi_reference`
A 24-year-old woman in a gray raincoat stands at the entrance of an
abandoned subway station. Wide shot, rain pouring down outside, neon
residue lighting from above. She holds a vintage cassette recorder.
**Negative constraints:**
- no other people in frame
- no clear license plates
- no text overlays
**Generation notes:**
- requires character_reference
- requires scene_plate
**Prep images:**
- `char_lin_xia` (character_reference) → `assets/characters/lin_xia.png`
- `scene_station` (scene_plate) → `assets/scenes/station.png`
Copy the whole prompt into your video engine of choice (Sora, Veo, Kling, Wan…), attach the matching reference images (if any), and generate.
📋 JSON format (optional, off by default)
Below each shot there's also a collapsed-by-default "JSON format (for pasting directly into Sora 2 / Veo 3)" block. Expanding it reveals the same shot as structured JSON (fields include shot_id, environment, subject, action, camera_angle, description, audio, etc.).
If your target engine expects structured prompts (e.g. Sora 2, Veo 3), expand and copy the JSON; otherwise leave it collapsed — it doesn't affect the plain-text version at all.
This output is off by default; enable "Generate JSON prompts" under ⚙ Settings → Generated Content.
8.3 Download all
The ⬇ Download All button on the "Output Files" title bar (Artifacts tab) bundles every human-readable output for download, handy for delivery or backup.
8.4 ↻ Regenerate
Next to "⬇ Download All" on the "Output Files" title bar there's a ↻ Regenerate button. Clicking it re-derives every output file from the structured data already in the workspace — no AI calls, no tokens spent.
Typical use case: after changing a layout-layer setting in ⚙ Settings (e.g. the "no BGM" statement in the sound description, or negative-prompt presentation), you want an already-completed old project to reflect the new setting without re-running any step. This button gets you there in seconds.
Note: generation-layer knobs (e.g. the sound description body itself, whether the aspect-ratio/duration string is omitted) and narrative text after switching UI/output language still require re-running the relevant step — "↻ Regenerate" alone isn't enough for those.
8.5 The Log tab
The "Log" tab records every action from this session. Log entries are always in English with fixed 24-hour timestamps, regardless of interface language — this is intentional, so logs stay consistent and readable no matter which language a user is reporting a bug from.
9Reference-image / first-frame batch commands
Once Step 5 has run (and the relevant toggle is on — on by default since 1.8.0), batch-command panels appear on the Artifacts tab below the Output Files list (the Blender previs panel is covered in §9.4):
9.1 Why do you need these images?
Most AI video engines (Sora, Veo, Kling, etc.) support several input modes, some of which need reference or first/last-frame images prepared first.
The storyboard artist (Step 4) suggests an engine mode for each shot; the video prompt designer (Step 5) commits to a final mode and lists which reference images that shot needs. There are 8 modes:
| Engine mode | Purpose | Example platforms |
|---|---|---|
text_only | Text only, no reference images needed | Pure atmosphere / environment shots |
first_frame | One first-frame image, locks the opening composition | Sora, Veo |
first_last_frame | First + last frame, locks the beginning and end | Veo, Kling |
multi_reference | 1-3 images (character/scene/prop) locking multiple elements at once | Seedance, MiniMax |
character_lock | A character reference set, locking the same character across shots | Various character-binding mechanisms |
style_reference | One style baseline image, locking color grade / texture | Various style-reference features |
motion_reference | Provide a demo motion video; the tool mimics the motion trajectory | Runway Motion Brush, Pika Motion, Kling Motion |
video_edit | Modify an existing video (change background, add effects, regrade color) | Pika Pikaffects, Runway Video-to-Video, Kaiber |
9.2 Main path: batch generation commands (on by default, zero tokens)
- Reference-image batch commands: up to 10 images per batch — click "📋 Copy this batch" and paste it into any image-capable AI chat (ChatGPT, Gemini, Claude, etc.) to have it generate the images.
- First-frame batch commands: deterministically derived from the committed video prompts (no model call), up to 10 shots per batch, best for shots using
first_frame/first_last_framemode — also "📋 Copy this batch" into any image-capable AI.
Two ways to use them: with web ChatGPT (cannot save files, about 10 images per request) copy batch by batch, paste each batch once, and save the images under the target file names yourself. With Codex desktop or another AI that can save files, click "Copy whole run (for Codex desktop and other AIs that can save files)" on the panel and paste the whole thing once: it generates the reference images first, then the first frames, and saves each into the project folder (codex_image_run.md, also zero tokens). If it stops midway, paste the same text again: images that already exist are skipped, so you do not pay twice.
Both are zero-LLM-call, zero-token derived documents, on by default since 1.8.0. If a panel is empty, the project most likely hasn't reached Step 5 yet, or the corresponding toggle was manually turned off — go to ⚙ Settings → Generated Content, check the box, and click "↻ Regenerate" (§8.4, and the FAQ in Chapter 13).
9.3 Using the images in your video engine
shot_prompts.md lists the reference-image paths for each shot. Upload the images you generated from a pasted batch command into the matching slot on your video engine (first frame / reference image / character cast).
9.4 Blender previs (optional)
Right after Step 4 (Storyboard) finishes, just before the "Storyboard lock-in" gate (§4.4): a good moment to run one pass of Blender greybox previs and watch the camera moves and edit rhythm before spending Step 5's tokens.
When "Generate Blender previs instructions" is on (off by default — tick it first under ⚙ Settings → Generated Content), the Artifacts tab gets an extra "Blender Previs Instructions" panel: previs_prompt.md, a transcription of the storyboard, story bible, asset registry and other existing structured data into one English instruction sheet — zero LLM calls, zero tokens.
After manually editing the script, production settings, or an earlier step's result, you don't need to re-run Step 4 — go to the Artifacts tab and click "↻ Regenerate" (§8.4) to update this document.
Install and connect (one-time)
To actually run this Blender previs document, your machine needs Blender, and Codex needs to be able to drive it. The install package ships a dedicated add-on: press one button in Blender and it connects to Codex by itself — no uv, no hand-editing of config files (this is unrelated to S2P itself, which needs zero installation for this). The steps below are a one-time setup:
- Install Blender (LTS): run
winget install BlenderFoundation.Blenderin PowerShell, or download it from blender.org. - In Blender: Edit → Preferences → Add-ons → menu (top right) → Install from Disk, pick
Blender-Addon\blender_codex_mcp_addon.pyfrom the install package, and enable "S2P Blender Codex MCP". - In the 3D viewport press
Nto open the sidebar → "S2P" tab → press Start. The panel shows "Running (port …)" and "Registered with Codex"; the first time it also shows "Restart Codex once to pick it up". The add-on only adds one block that it manages itself to Codex'sconfig.tomland leaves the rest of your settings alone. - When the panel shows "Restart Codex once to pick it up", restart Codex once (Codex CLI and the desktop app share the same config). If a later Start shows only "Registered with Codex", no restart is needed.
- Open Codex in a dedicated, empty folder, first ask a read-only question like "list the objects in the current scene" to confirm the connection, then paste the whole
previs_prompt.mddocument.
Common gotchas
- Registered isn't the same as connected — after the first registration or a path update you must restart Codex for it to take effect.
- Blender has to already be open and you have to have pressed Start in the panel before Codex can connect; after restarting Blender, press Start again.
- If Windows Firewall prompts you on the first connection, allow it (local 127.0.0.1 only, not exposed externally).
- If the panel says it cannot register (your
config.tomlhas a syntax error, or it contains your owns2p_blendersettings), the add-on leaves your file alone: fix the syntax ofconfig.toml, or delete your owns2p_blenderlines, then press Start again. Only if the file is locked or not writable, use "Copy Codex config text" in the panel and add it by hand. - If Blender is the Microsoft Store or snap build, file paths may be redirected and the panel shows a warning; if Codex cannot connect, use the blender.org or winget build instead.
Advanced / other CLIs
If you use Claude Code, press "Copy Claude Code command" in the panel and run the copied claude mcp add s2p-blender -- … command in a terminal (on Windows use Command Prompt (cmd): PowerShell swallows the --).
You can also use the third-party blender-mcp instead: install uv, download addon.py (GitHub: ahujasid/blender-mcp), install it in Blender and enable "Interface: MCP for Blender", add the block below to %USERPROFILE%\.codex\config.toml, then press "Start MCP Server" in Blender's sidebar (port 9876).
[mcp_servers.blender]
command = "uvx"
args = ["blender-mcp"]
Note the table name is mcp_servers (underscore) — writing mcp.servers (dot) fails silently. The Claude Code equivalent is claude mcp add blender-mcp -- uvx blender-mcp.
Three usage rules
- Paste the whole document into a Blender-MCP-capable flagship model (Blender MCP must already be installed). Previs uses neutral-gray stand-ins; any light that changes (e.g. a lamp dimming out) must stay visible in the previs.
- When generating video, use each shot's previs clip as a reference video; attach a reference image for every recurring subject and major set — an element with no reference image inherits the greybox's gray color in the generated result.
- Open the video prompt with one sentence dividing the labor, e.g.: "The reference video sets only the camera position, framing and the timing of the light changes; its gray blockout shapes and flat surfaces are placeholders. The reference images set the exact look of the subjects and sets." (sample wording: the first sentence matches what was used in validation; the second sentence has been generalized.)
Keep previs and first frames consistent
The storyboard describes composition in only one line of free text, so if previs and first frames each interpret it on their own they will drift apart. Let each one refer to the other — either order works:
- First frames exist first (generated earlier in the same conversation, or provided as files such as
assets/first_frames/<shot_id>.png): the previs instructions tell the model to treat the first frame as the composition authority — shot size, camera height and angle, subject placement and facing follow the image — and its self-check reports per shot whether it "matches first frame / partially / does not match". If two first frames of the same set contradict each other, it lists that too (a sign that first frame is worth regenerating). - Previs first: when generating first frames, attach
previs/first_frames/<shot_id>.pngas a composition reference — camera position, framing, subject placement and facing follow that image, while the look still comes from the prompt and reference images and no gray blockout look may appear. The first-frame batch instructions (first_frame_batches.md) already carry this note when "Generate Blender previs instructions" is on.
Suggested order: previs → reference images → first frames → video. Character and prop reference images don't depend on camera position; a scene plate (scene_plate) is the full view of the set, and where its windows, doors, furniture and light sources sit should match the scene you built in Blender — so it likewise takes the previs image of that scene's widest shot, previs/first_frames/<shot_id>.png, as a layout reference (the look still comes from the prompt). When "Generate Blender previs instructions" is on, the reference-image batch instructions (gen_prep_images_prompt.md) already carry this note in any batch that contains a scene plate.
Cost: this step costs zero tokens on the S2P side; what you actually spend is whatever the model you use to drive Blender (a flagship model / your subscription quota) consumes — not this tool's own API budget.
Previs reference shot prompts (optional): when "Generate Blender previs instructions" is on, Step 5 produces one extra file, shot_prompts_with_previs.md — the same format as shot_prompts.md (same heading, sections, negative-prompt and dialogue handling, optional JSON block) with just two differences: each shot's prompt is preceded by the labor-division sentence from rule 3 above and an itemized appearance paragraph (from the asset registry's reference_prompt and the scene's fixed elements), and the "Prep images" list starts with one extra line for that shot's previs clip, previs/shots/<shot_id>.mp4.
It is assembled server-side, zero LLM calls, zero tokens, and shows up on the Artifacts tab where, like every other output, it can be imported, exported, previewed and downloaded.
Each shot's prompt text (labor-division sentence and appearance paragraph included) is capped at 2,500 characters (Higgsfield's per-prompt limit); over budget, the appearance descriptions are trimmed first, then the prompt body's style sentences, and if it still doesn't fit the text is truncated and that shot's "Generation notes" gains a "truncated to fit the 2,500-character cap — please tighten it by hand" line.
If a scene has no scene_plate reference image at all, that shot's Prep images list ends with a "missing scene_plate" note, and the Artifacts tab's mechanical-check summary surfaces the same gap project-wide.
How to use it: hand this prompt, that shot's previs clip and its reference images to a video-gen tool that supports reference video; engines that don't need a reference video keep using the plain shot_prompts.md.
10QA review (Step 6 / multi-round automatic review)
Step 6 is the continuity review (QA & Revision) — after reading everything Steps 1-5 produced, it runs up to 12 rounds (API mode; subscription mode runs 20, extendable up to 40) of fix-and-verify, then submits one final report.
- Read all of 1-5
- Loop (API: up to 12 rounds; subscription: 20, up to 40): Find issues → Apply fixes → Verify the fixes ↻
- Submit final QA report (overall score / findings / residual risks)
10.1 How to run it
- On the Step 6 card in "Workflow," click "Run this step" (or let it run automatically as part of "Run 1-6")
- The progress bar updates live with "Round N: applied X fixes"
- In API mode it typically takes 1-3 minutes, depending on how many issues come up; subscription mode runs more rounds and can take noticeably longer
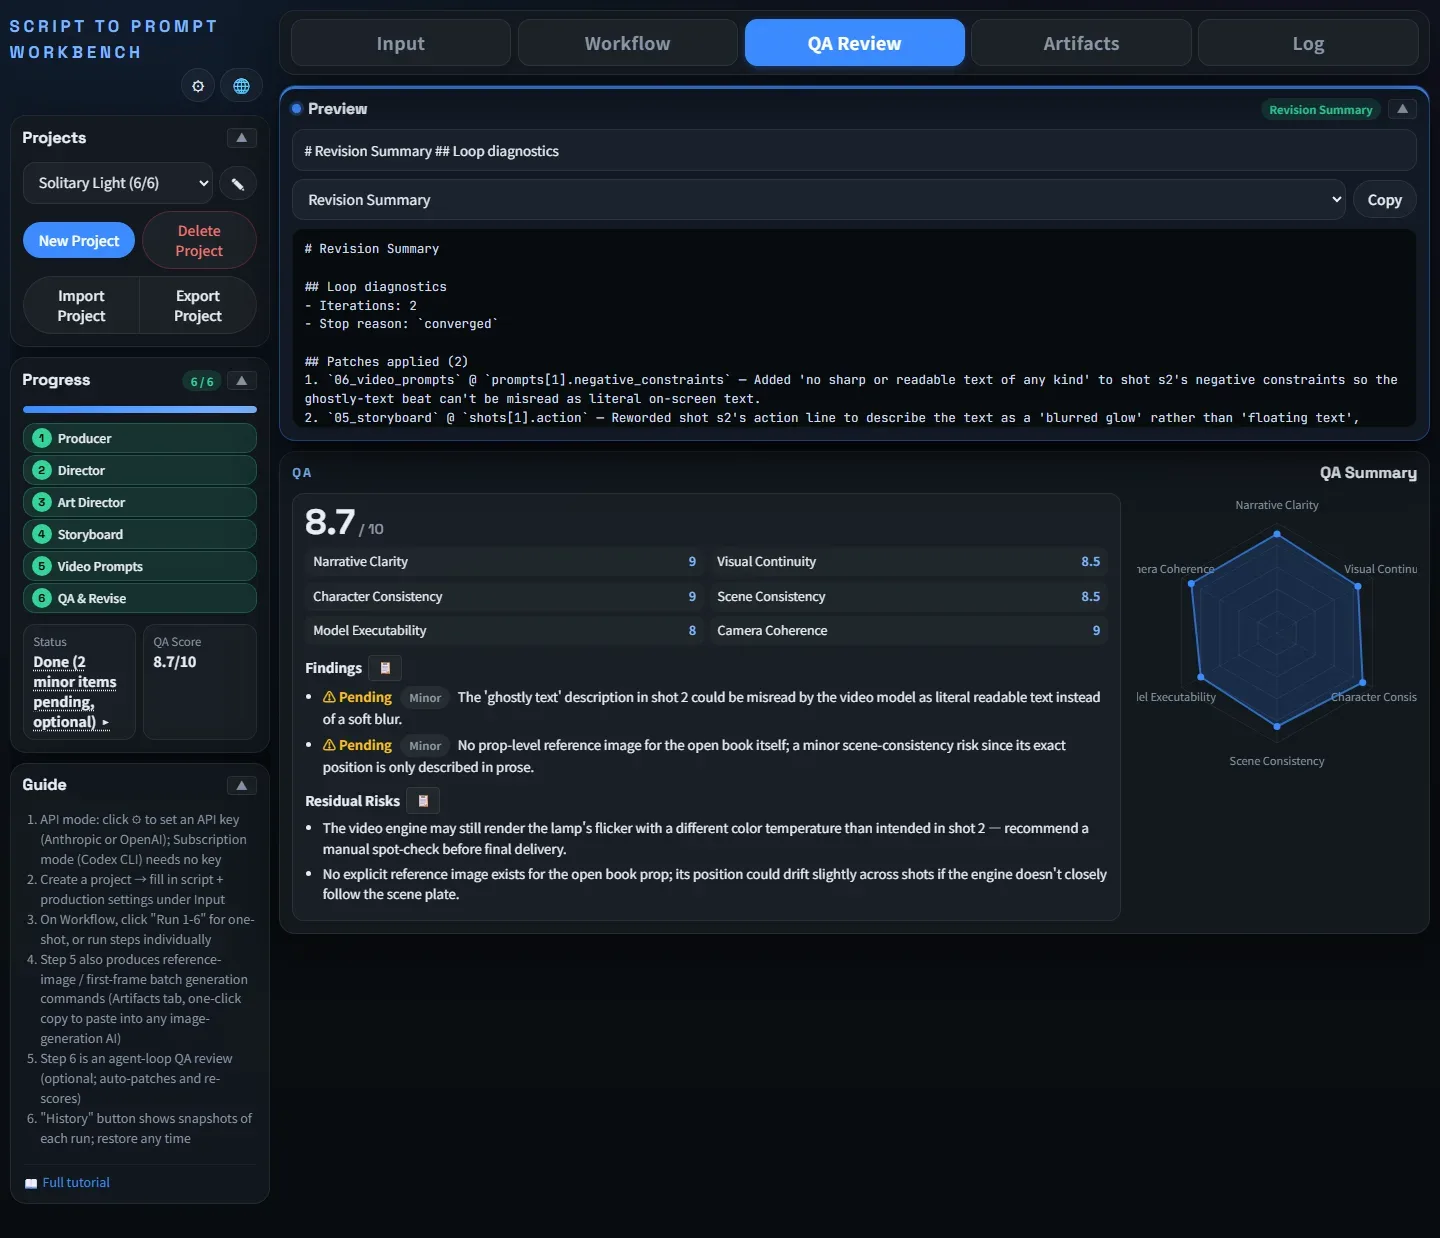
- Once done:
- Switch to "QA Review" to see the radar chart of scores
- Check the "Findings" list
- Check the "Residual Risks" list
10.2 Scoring dimensions
| Dimension | Meaning | Target |
|---|---|---|
| Narrative clarity | Is the story clear and coherent | ≥8 |
| Visual consistency | Visual style consistency across shots | ≥8 |
| Character consistency | Characters stay consistent throughout | ≥8 |
| Scene consistency | Scenes stay consistent throughout | ≥8 |
| Model executability | Can a video model reliably execute this | ≥8 |
| Camera coherence | Camera logic makes sense | ≥8 |
10.2.1 How the overall score is computed
The overall score shown on the QA Review tab is the average of the six dimension scores above (rounded to one decimal place), computed server-side — not a number the AI reports itself. This guarantees the overall score always matches the six sub-scores, so you never see a high overall score with weak sub-scores (or vice versa).
Unresolved issues don't lower the overall number — they're listed explicitly under "Findings" and "Residual Risks" instead. If you want to know exactly what's still unresolved, those two sections are more informative than the overall score alone.
10.3 Not satisfied? Run it again
Just click "Run this step" again. The system remembers what it fixed last time, but to keep the message size manageable, the previous round's fix log is passed in as a one-line summary rather than the full detail (details are read on demand, not dumped wholesale into context); the new round focuses on "did the previous fixes introduce new problems" and "what was missed before," avoiding redundant work.
10.4 Cancelling
If you decide mid-run this isn't the right direction, click "Cancel" on the card. The system detects this and exits gracefully at the next round check. Fixes already applied stay in place, and a QA report marked "cancelled by user" is written.
11History snapshots & restore
Every successful step run automatically takes a snapshot. Each step keeps the most recent 10. You can restore any earlier one at any time to undo a re-run.
11.1 Browsing history
The "Workflow" tab has a "History" button next to "Run 1-6." Opening it shows every snapshot, each with:
- Timestamp (the moment it ran)
- Type badge: automatic / pre-restore safety backup
- Step name and the model used at the time
- Diff from the current state: flags what's different (or shows "same as current")
- [Restore this version] / [Delete] buttons
11.2 A classic use case: A/B comparing models
- Run Step 5 with Sonnet → snapshot A is auto-taken
- In ⚙ Settings, switch Step 5's model to Opus (Chapter 12)
- Run Step 5 again → snapshot B is auto-taken
- Compare the two
shot_prompts.mdoutputs - Prefer Sonnet's? Open "History," find snapshot A, click "Restore this version"
- The system first auto-saves the current (Opus) state as a pre-restore safety backup, then restores A
- The Opus result isn't lost — you can switch back to it any time
11.3 Snapshot types
- Automatic snapshots: created after every successful run; each step keeps the most recent 10.
- Pre-restore safety backups: taken right before any restore. Never auto-deleted, so a restore itself can always be undone.
12Switching models per step
Every step's model choice lives in ⚙ Settings → "🔑 Connection & Models." Defaults are already tuned (Anthropic: Sonnet 5.5 for Steps 1-5, Opus 5.5 for Step 6; OpenAI/Subscription: GPT-6 Luna for Steps 1-5, GPT-6.1 Sol for Step 6), and you can adjust any step at any time — including mixing API mode and Subscription mode (§4.5).
Typical reasons to adjust:
- Step 6 hits a rate limit: switch it to Sonnet 5.5 (typically looser limits)
- Cutting costs while experimenting: switch all 6 steps to Haiku 4.5 (cheaper, lower quality — good for verifying the pipeline works end to end)
- Final delivery: bump Step 6 to Opus 5.5 / GPT-6 Astra for maximum quality; Step 5 produces the most output, so weigh the cost before upgrading it too — keep the rest on Sonnet/Luna
- Mixing providers: e.g. Steps 1-5 on Anthropic, Step 6 on GPT-6 Astra — both API keys need to be set
- No API key at all: switch to Subscription mode (Codex CLI) — free for light use
This setting is global (not tied to any one project — every project shares it), stored in the server's data/settings.json.
13FAQ
Q1. I only want text prompts, no images — is that OK?
Yes. Reference images are entirely optional. The whole 1-6 pipeline runs with just an Anthropic or OpenAI API key (or Subscription mode) — no separate image-generation tool required.
Q2. Can I generate the reference images with Midjourney / Flux / Imagen instead?
Yes. Both the batch generation commands and prep_images_summary.md are human-readable. Take the prompts to any image engine, drop the resulting files at the target paths, and everything downstream behaves the same.
Q3. Why does Step 6 take so long?
Step 6 is a multi-round automatic review: fix-then-verify, up to 12 rounds in API mode (about 1-3 minutes) or 20 rounds, extendable to 40, in subscription mode (which can take longer). Watch the "Round N / X fixes applied" progress text. If it's taking too long, "Cancel" exits at the next round.
Q4. "Run 1-6" fails partway through — now what?
The error dialog tells you which step it stopped at. Fix the underlying problem (quota exhausted, network dropped, etc.), then click that step's "Run this step" to retry just that one step. Earlier successful steps don't need to be touched.
Q5. I finished the whole pipeline, then realized the script needs a change — do I have to rerun everything?
Yes. Once script.md changes, every downstream step's output is out of sync with the new script. Recommended:
- Check "History" first to confirm you can restore an earlier state if the redo turns out worse
- Click "Run 1-6" for a clean redo
Q6. I'm running behind a reverse proxy or tunnel (ngrok, Nginx…) and requests keep getting rejected?
Any deployment that isn't plain localhost — a reverse proxy, a tunnel, or a real cloud deployment — needs the S2P_ALLOWED_HOSTS environment variable set to the public hostname, or the server's Host check rejects the request (this defends against DNS rebinding and cross-site writes — see the README's "Configuration" section). Plain localhost use is unaffected.
Q7. How much disk does workspace/history use?
A single project's workspace is roughly 100KB-500KB; history keeps 10 snapshots × 6 steps = 60 snapshots, each ~50-200KB → roughly 12MB per project. If self-hosting, make sure DATA_DIR and PROJECTS_DIR point at persistent storage.
Q8. Can I run this fully offline, with no external API calls?
No. The core of the main pipeline (Steps 1-6) is calling an LLM — API mode needs a key, Subscription mode needs the local Codex CLI reaching ChatGPT, and both need network access.
Q9. Does the trial version have a time limit? What happens after it expires?
The trial has no feature limitations at all — it's identical to the full version except for the usage window. It works normally through the expiration date; after that, the app shows an expired screen and stops serving requests. The settings panel footer always shows the licensee name and expiration date for reference. Contact your reseller for the full version.
Q10. The reference-image / first-frame batch panels on the Artifacts tab are empty?
Most likely the project hasn't reached Step 5 yet, or those two toggles were manually turned off (they're on by default since 1.8.0). Go to ⚙ Settings → Generated Content, check "Generate reference-image batch generation commands" / "Generate first-frame batch generation commands," and click "↻ Regenerate" (§8.4).
Q11. I switched the UI language but the output files still show the old language?
The interface language only changes static labels — it doesn't retroactively translate already-generated output. If you changed "🌐 Output Language" (§6.5), layout-layer text updates instantly with "↻ Regenerate"; but narrative text each step already generated (titles, summaries, QA reports, etc.) still needs that step re-run to pick up the new language.
Q12. My projects all disappeared after upgrading to a new version?
They're not gone — the new version unzips into a brand-new folder that doesn't have your old data yet. See §5.2 "Migrating from an older version" for how to bring it over.
14Appendix A: A ready-to-copy example project
Below is a short example suitable for a first practice run. Run the whole pipeline on this once before switching to your own content. (Scripts can be written in Chinese, English, or Japanese; the example here is kept in its original Chinese — feel free to rewrite it in your own language.)
script.md
# 孤燈 Solitary Light

## 一句話梗概
深夜書房中,一盞老檯燈在主人離去後獨自亮著,
光影間浮現書頁上的文字幻象,最終燈光緩緩熄滅。

## 目標平台
AI 影片生成(Sora 2 或 Veo 3.1,無需精確嘴型)

## 目標片長
約 15 秒(約 3-4 個鏡頭)

## 世界觀
一間佈滿書籍的老式書房,深夜時分,只有一盞黃銅檯燈亮著。
氛圍寧靜帶著淡淡懷舊感。窗外能看到月光。
時代為現代但室內裝潢偏 1970s 風格。

## 角色

### 黃銅檯燈(主角,無人類)
- 外觀:復古黃銅檯燈,綠色玻璃燈罩,溫暖的暖黃色光芒
- 不可變特徵:黃銅材質基座、綠色斜口燈罩、垂直燈頸
- 性格象徵:守候、見證者

(注意:此片無人類角色,主角是檯燈本身)

## 場景

### 場景一:獨自發光
- 地點:老式書房桌面
- 時間:深夜
- 劇情:書房空無一人,檯燈獨自亮著,光線照亮桌上攤開的書本
- 鏡頭重點:穩定 wide shot,建立空間感

### 場景二:文字幻象
- 地點:同上
- 時間:深夜
- 劇情:燈光微微閃爍,書頁上的文字似乎浮起,
  在光暈中形成模糊的影像(可以是字、可以是書中描述的場景剪影)
- 鏡頭重點:close-up,緩慢推鏡

### 場景三:緩緩熄滅
- 地點:同上
- 時間:深夜至黎明
- 劇情:檯燈的光芒逐漸變暗,最終熄滅,
  窗外第一道晨光照入,書本回到平靜
- 鏡頭重點:medium shot,靜態構圖,光線變化主導
production_settings.md
# 影像風格參考

## 影像風格
電影感(cinematic realism)、暖色調、低對比、安靜氛圍。
質感參考:Vermeer 畫作的光影處理、Wong Kar-wai 暖色調氛圍。

## 光線
- 主光源:檯燈的暖黃光(色溫 2700K)
- 輔助光:窗外月光(冷藍色,微弱)
- 光比偏高,大量陰影
- 場景三尾段:晨光(冷白色)逐漸取代

## 鏡頭節奏
緩慢、沉靜。以慢推、靜態構圖、長鏡頭為主。
避免快速剪輯、快速運鏡。

## 色彩傾向
- 主色調:暖黃、深棕、墨綠
- 強調色:銅金色(檯燈金屬反光)
- 整體飽和度偏低

## 禁忌風格
- 不要卡通 / 動畫風格
- 不要高飽和度
- 不要快速剪輯
- 不要任何文字 / 字幕 overlay
- 不要恐怖 / 詭異氛圍

## 參考作品
- 攝影:Vermeer 室內畫
- 電影:王家衛《花樣年華》室內景
- 廣告:Apple 早期 macOS 廣告的居家場景

---

# 專案設定

## 商業目標
概念驗證(Proof of Concept):展示 AI 影片生成
在「靜物敘事 + 光影變化」類型的表現力。

## 受眾
對 AI 影片創作有興趣的創作者與技術愛好者。

## 成功標準
- 三鏡之間光線、桌面、書本位置一致
- 檯燈的造型在三鏡中完全相同
- 15 秒內能傳達「寧靜→懷舊→歸於平靜」的情緒弧
- shot_prompts.md 可以直接餵給 Sora 2 / Veo 3.1

## 製作限制
- 無人類角色(避免 AI 生成人臉的不穩定)
- 場景固定不變(避免複雜場景轉換)
- 動態元素僅限光影變化、煙塵粒子、書頁微動
- 避免任何精確的字體 / 文字(字幻象用模糊光暈即可)

## 交付格式
- 畫面比例:16:9
- 幀率:24fps
- 解析度:1080p
- 無配樂、無字幕
Suggested workflow
- Create a project named
Solitary Light - Paste the two blocks above into the "Script" and "Production Settings" sub-tabs, then "Save All Input"
- Switch to "Workflow" and click "Run 1-6"
- Once Step 4 finishes, click "✅ Looks good, continue" at the Storyboard Approval gate
- Wait for the run to finish (6 steps, including Step 6 QA)
- Check
shot_prompts.mdon the Artifacts tab, along with the reference-image / first-frame batch command panels - Paste a batch command into any image-capable AI to get reference images
- Take
shot_prompts.md's prompts + reference images to Sora 2 / Veo 3.1 to try generating video
15Appendix B: All output files at a glance
All files live under projects/{your_project_id}/output/.
| File | Produced by | Purpose | Default |
|---|---|---|---|
project_summary.md | 1 Producer | Project positioning summary | On |
director_analysis.md | 2 Director | Scene breakdown, dramatic structure, shot strategy | On |
story_bible.md | 3 Art Director | Character bible (invariant traits) + scene rules | On |
asset_registry.md | 3 Art Director | Asset inventory (characters / scenes / props) | On |
storyboard.md | 4 Storyboard Artist | Shot list (with suggested engine mode per shot) | On |
previs_prompt.md | 4 Storyboard Artist | Blender previs instructions (optional, see §9.4) | Off (249; was On 136) |
shot_prompts.md | 5 Video Prompts | ⭐ Main deliverable: each shot's video prompt (with an optional collapsible JSON block) | On |
shot_prompts_with_previs.md | 5 Video Prompts | Previs reference shot prompts: a variant of shot_prompts.md for engines that take a reference video (optional, see §9.4) | Off (249; was On 181) |
asset_prompts.md | 5 Video Prompts | Generation prompts for reference images | On |
prep_images_summary.md | 5 Video Prompts | Reference-image plan summary | On |
gen_prep_images_prompt.md | 5 Video Prompts | Reference-image batch generation commands (paste into any image-capable AI) | On (108) |
first_frame_batches.md | 5 Video Prompts | First-frame batch generation commands | On (108) |
production_guide.md | 5 Video Prompts | Production guide (human-readable; maps engine modes to reference images) | On |
manual_mode_guide.md | 5 Video Prompts | Manual-mode execution guide | Off |
revision_tasks.md | 6 QA Review | List of QA findings | On |
revision_summary.md | 6 QA Review | Fix summary + scoring diagnostics | On |
S2P Storyboard Workbench — Full Tutorial v3.0 (for 1.8.x).
Back to S2P Workbench